A CoolSculpting® Session
The Day of Your Procedure
There are no restrictions prior to your CoolSculpting treatment.
The first step | PHOTOS
Photos of the area(s) to be treated are taken in order to evaluate the success of the treatment. Your comparison photos are taken 3 months later.
 The second step | MARKINGS
Your treatment area (e.g. your tummy) will be marked by pen to ensure proper placement of the applicator.
The third step | COOLING PAD
A cool gel pad is placed over the area so that the suction of applicator is more comfortable.
 The fourth step | APPLICATOR
A specially designed cooling applicator uses vacuum pressure to draw the stubborn fat into the cooling panels.
The fifth step | VERIFICATION
The CoolSculpting technician verifies that the suction was successful (i.e., the targeted area was in fact drawn into the applicator).
 The sixth step | START
The the cooling action begins. The applicator starts to gently cool the area that has been drawn in. It targets your fat cells only, leaving all surrounding tissue intact.
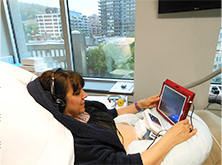
During the 60-minute cooling, you can sleep, catch up on some reading, or even work.
The seventh step | MASSAGE
 Once the 60-minute cycle ends, the applicator is lifted off your skin and the area is massaged for a few minutes.
Steps 1 through 7 are repeated for each area to be treated.
After your treatment, you can resume your normal activities. There are no restrictions to what you can or cannot do.